The Lighting On The Wall

The other week I wrote about how Mark and I got rid of a 5 amp lighting circuit in the old house, only to put one into the new house. And I’ve got a similar story today, this time about wall lights.

img_3456

To be fair to us, the wall lights we took out (from the sitting room) could not have been more eighties. They were plaster sconces which I think were meant to be painted the colour of the wall but hadn’t been. They looked kind of clumsy and threw the light straight upward rather than helpfully outwards – rather like the bar in an airport hotel (or the stairwell at work).

img_3452By contrast, in each of the four places we’ve used wall lights here, it’s been to a particular purpose. We’ve also made sure that they hold their own as decorative items. The Artemide Teti lights (with Tala Porcelain 1 bulbs) in the kitchen are a neat way to light the dining area without obstructing the skylights. They’re on a separate circuit to the lights for the cooking zone – so that we can control the mood. I had originally wanted something bigger and more dramatic but being toward the end of the project money was tight – and I think that actually pushed me in the right direction.

img_3451Also in the kitchen is a wall mounted Anglepoise spot. Again this is on a separate circuit and controlled by an integral switch. It was a particular bargain – picked up in the clearance section at John Lewis Stratford City for a third of list price.*

It means we can just light our window nook – either to curl up on the sofa for a read, or to provide a gentle residual glow from the kitchen while we’re in the sitting room next door.


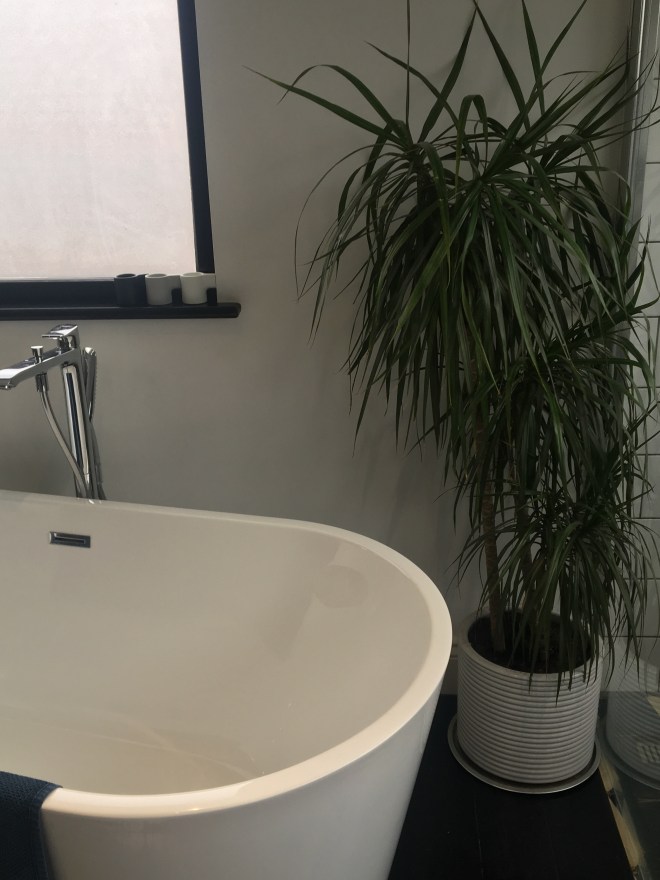
By contrast the wall light in our loft dressing room is one of the least bargainy things in the house – a full price Riddle light from Bert Frank which I fell in love with the first time I saw it in an interiors mag. I was happy to splash out because it does an important job – providing a moody light for bathing when you don’t want the glare of the spots. I’ve never really liked candles so this suits my aesthetic much better.


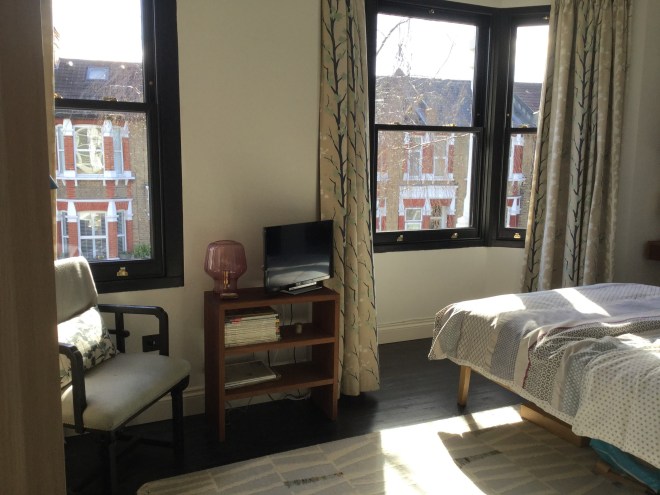
Finally to the spare room where Made.com Cohen wall lights offer an affordable and practical way of minimising bedside clutter. And not a sconce amongst them.

img_3477


* This is a top tip if you live in East London and are hunting for bargain lights – there often seem to be good quality lights on discount in this section – I assume they’re customer returns which they’ve decided not to return to the depot.

Make Yourself At Home

img_0725-1

I’m returning to the guestroom this week, to talk about how we designed the space. We wanted family and friends to be comfortable staying for a decent length of time which meant it couldn’t do double duty as an office or workroom.

It needed a generous bed, somewhere to relax and sufficient clothes storage for a week-long stay. The starting point for the colour scheme, which is more subdued (restful?) than the rest of the house, were the curtains which we brought with us when we moved across the road and the fabulous sketches above the bed by local artist Nish Designs.

Ideally the room also needed an en-suite. Because however wipe-clean we’d made the family bathroom there was no guarantee it would stay that way. I played with lots of layouts but couldn’t find one I was happy with. They all seemed to compromise the bedroom space too much.

img_3475

And then inspiration struck us both at once – we could steal 30cm of depth from the  middle bedroom (the dead space to one side of the door) to help create a metre wide shower room across the back wall. The space saved meant a kingsize bed could sit facing the bay, and there would still be space to walk round.

It helped to have an unobtrusive bed frame, and the Habitat Tatsuma fit the bill perfectly. Wall mounted EKET boxes make great bedside tables, and keep the floor clear and a 30cm deep PAX frame with two drawers provides a decent amount of wardrobe space, without crowding the room.

We even found room for a small television, redeploying our old hall console as a stand/ bookshelf.  And using the rear wall rather than the far wall for our ensuite meant we got to save the house’s last remaining original fireplace (the others had gone before we moved in). Overall it’s one of my favourite spaces in the house – even though it’s the one I use least.


30 Minute Makeover

I was feeling less than chipper last weekend – long week at work, still not got everything done, you know the kind of thing. So when I woke up early on Sunday I decided to crack on with some emails – only to find I’d missed the memo about the server being down all day.

Well and truly awake and even grumpier than before, I needed a distraction. It was time to sort out the hallway cactus collection. As you’ll recall I’d managed to destroy some of the previous incumbents and the new line up had been sitting a little forlornly in their plastic pots for a couple of weeks.

img_3260

I had one lovely pot from HKD Ceramics (made by talented local potter Harmeet) ready to reuse, but needed one more. Time for a quick klutz-friendly craft project to cheer me up. My definition of klutz-friendly is something which allows me to put colours, patterns and shapes together without disclosing my profound absence of freehand drawing skills.

img_3412

For that reason I am a big fan of washi tape and a couple of years ago I spent a happy half day with some tape and some paint transforming some IKEA plant pots to house my kitchen herb collection. Washi and plant pots aren’t wholly compatible though, because the tape is straight and the pot sides are conical and wrinkles ensue. Last time round my solution was to go upwards and outwards, and paint the V-shape in between.


This time I needed a really small pot, with a footprint that would sit comfortably on the picture ledge which serves as my hallway radiator shelf.

img_3425

I nipped out to the garage and found one tiny terracotta number that would fit the bill. It had a rim which I hoped was straight enough to take the tape without wrinkles (you can see it wasn’t quite, but never mind) and a base which was much too tiny even to try and apply washi.


I used three layers of tape to improvise a vaguely 50s pattern for the top section, and then dug out the leftover Obsidian Green from the kitchen cabinets to paint the rest.  One coat before breakfast and one after – no more than twenty minutes work in total and another ten for the re-potting.  By no means perfect of course, but enough to lighten the mood.

The Flick of a Switch

It’s Wednesday so we’re moving away from decor to talk about the ‘bones’ of the house. Or in this case the nerves of the house – the wiring.

And more specifically my sitting room lighting circuit. And going from this…

To this in the flick of a switch. The secret is the 5 amp lighting circuit. They’ve been around forever, and if you or your parents moved into a house anytime from the 70s to the noughties you probably ripped one out.

img_3423In fact I have a vague memory of Mark and I grubbing one out of our old house, because we’d no idea what these tiny sockets could possibly be for.

We rediscovered their genius by accident, when planning the granny annex that never was. My mum has a morbid hatred of overhead lights, and told the architect that she didn’t want any installed, as she would only use sidelights.

Ah-ha, he said (but not in a Partridge-esque way), you need a 5 amp lighting circuit. A separate circuit, wired into the walls, for which all the sockets can be controlled by a single (light) switch. You’ve probably used them in hotel bedrooms without realising. In our case we have two – one for the back and one for the front half of the sitting room, and I wouldn’t be without them.

img_3446

It means you can use kindly sidelights rather than harsh overheads without thought  – or the faff and backache of switching them all on and off individually. They are both controlled by the  bottom (2 gang) switch here with the overheads on the top one (which I never touch – although the boys still need training).


I’m not sure how easy it would be to retrofit, but if you’re rewiring anyway it couldn’t be simpler. All electricians are familiar with them, and many of them have them in their own homes (ours did). It’s just for some reason they don’t think of offering them to customers.

img_3422

Despite their low profile there seem to be sockets available in most ranges, and an increasing number of plug options too. I love these retro looking black ones that I sourced online.

So why not go for it…you have nothing to lose but your sciatica and your (appearance of) fine lines and wrinkles.


Living It Up

One thing I’ve not done much of so far is talk about whole rooms. If I’m honest that’s a lot to do with the limitations of iPhone photography, and the challenge of getting a picture which properly illustrates the layout. But we get a lot of compliments about the loft so I thought it would be worth talking how we planned it and what we were hoping to achieve.


A lot of the deliberations I touch on here actually took place at the old house, as we pretty much replicated the design from one house to another. And they were also informed by some sage advice from the company we used, Bespoke Lofts.

img_3449

The first decision we was whether to just convert the loft at the front of the house, or to go for an L-shape which maximised the space allowable under permitted development. The latter option was about 30% more expensive but would give us  nearly double the space. It seemed worthwhile on that basis alone, but became more so with the realisation that since the rear could be built out as a dormer box it would all be full height, whereas the front section would necessarily have a sloping ceiling.

Many people who go for this larger option aim to boost resale value by incorporating two bedrooms and a bathroom, and if you have a large family that obviously makes sense. But we knew we were sticking at two kids, so our aim was to free up a spare bedroom downstairs, and make ourselves a sanctuary up top.

Key ingredients included a space to sit and read, a bath for the occasional luxury soak and a decent amount of wardrobe space. Previously the downstairs front room had been our bedroom and like many people we’d improvised wardrobes from the alcoves, but it had always felt like a slightly cramped compromise.

img_3450I also hankered after beautiful cedar-lined fitted wardrobes, but the budget didn’t allow. So rather than making the wardrobes to fit the space I made the space to fit the wardrobes. In this case asking our very patient Bespoke joiner and foreman Bradley to make sure that we had exactly 3 metres available between the front of the room and the half wall that shields the loo so that a run of PAX cupboards would squeeze in as if specially fitted. Then we improvised the shoe cubbies ourselves, from some cut down shelves. And, should we ever win the Lottery, I can still commission the cedar to fit the space we’ve got.

The one big change from the old house was the layout of the windows in the rear dormer, which needed some thinking through. Previously we’d looked out over rooftops, and had windows above our shower and loo, with an inset mirrored cabinet over the basin.

img_3436

This time though Mark was keen to maximise our views of the Flats, which meant windows all the way along, and two problems. The first being to preserve my modesty, since if I could see out to the Flats then…you get my drift. We addressed this with very some careful measurements and calculations before ordering the windows.

The second was where to store all our bathroom junk. Again, planning ahead was key, with built in alcoves for the things we needed always to hand (shampoo, loo roll, toothbrush (and charging socket)) and an inset cabinet in the far wall for the other bits.

It’s an unexpected bonus that the extra mirror helps bounce light (and views) around the room.


Old Patterns Die Hard

This post was inspired by @forestgatebijou (fellow Forest Gate house restorers) who Instagrammed a pic of some wallpaper they’d uncovered while renovating. Which set me off on a nostalgia trip, lamenting the lost patterns of yesteryear.

img_0600

First up is this gem which we found behind the radiator in the back bedroom. I really wanted to try and save a section for framing, but the message didn’t get through to the crew, so this photo is my sole memento. I love to imagine the excitement of the little boy  whose room it was (given the era I’m assuming it was a boy), when it first went up.

Image may contain: outdoor

And, with apologies for the terrible resolution, (it was taken several phones ago) there’s this. We found it under the floor at our old house when taking up a carpet, sadly too brittle to save.

I also love my collection of Midwinter Madeira pattern crockery, which called to me from a Columbia Road shop window just as we were buying the house, and this little Llangolen dish picked up in a charity shop in Rye.


Plus of course everything ever designed by Lucienne Day.  Still saving up for some Calyx Curtains.

img_3345

Not quite sure what it is about mid-century pattern – it might be to do with the use of colour, or maybe the (deliberate?) imprecision of the shapes. Whatever it is, for me it has a verve which contemporary work struggles to match.


Two for Joy

img_3368

Exciting news on The Last House today – we’re announcing a collaboration.

Many of you will already know about the work of Forest Gate’s own fabulous Magpie Project which supports under-fives in temporary accommodation. You can read about the challenges Magpie mums and minis are facing and the great work the project does here. I’ve contributed to the project in the past but wanted to do more – loving my home as much as I do, it’s horrible to think of others in such cramped and difficult circumstances.

I also love tinkering with houses, but I’m trying to be sustainable, and I don’t want to become one of those people who changes things for the sake of it. And since starting the blog several people have been in touch to see if I could offer some suggestions for their homes.

So here’s the idea…

(With all appropriate disclaimers about taking proper professional advice before embarking on major projects),  if you live in Forest Gate, Leyton or Leytonstone and would like some advice on furniture, layouts or anything interiors, The Last House will be offering consultations in return for a donation to the Magpie Project. You can get in touch via the contact page and I’ll try and get back to you within 48 hours. Look forward to working with you…

Black Is The New Brown (and Chrome and White)

I’m surprised I’ve not covered this before now, as it’s one of the main themes of the house. In fact I toyed with The House in Black (or similar) as a name for the blog. But much as I love him I didn’t want to be mistaken for a Johnny Cash tribute site.


It was a bit to do with Pinterest , in part inspired by the glam anthracite grey exterior of a friend’s house,  and a lot to do with rejecting white plastic and chrome. But basically a really high proportion of the core fixtures and fittings are black.

For the floors, the driver was that we wanted boards rather than carpet, we wanted them to be affordable (so pine not hardwood) but we didn’t want that nasty orangey yellow tone that pine is prone to take. The options were a limewash (which felt impractically pale), paint or a black stain. I’d had black painted floors in my old flat so I knew they didn’t darken a space in the way you might expect. In fact they act a little like a mirror and also provide a very effective frame for a pale toned rug.

Continuing the framing theme, the windows are also black. Black windows are all over the interiors media right now: they’re meant to make more of a feature out of the views.

Once I’d started I couldn’t stop, and radiators, curtain rails, sockets and light switches all followed. Some things were easier to source than others – it’s very hard to find a non-antiqued img_3316black door handle, but a company called Atlantic make a decent range of modern designs.Curtain rails were another challenge. Too many had some bits in black but with brackets, or stops only available in white or metal. In the end I bought a Silent Gliss range from The Curtain Pole & Track Company who also custom cut and bent the tracks to measurements I supplied for the bays – all turned around within a week.

In the bathrooms shelves, soap dispensers, loo roll holders, brushes and bins all follow the theme.

I love it, and it feels absolutely right for the space. But, given it’s also “on trend”, I’d love to know now whether I’ll still be loving it in ten or twenty years time.


The Last Foxhole

img_3366

A big moment for the Last House last week, when it started to earn its keep. A referral from a friend (thanks Suz!) led to the kitchen and sitting room starring in a photo shoot for Foxhole Spirits, makers of the delicious Foxhole Gin.

I was at work so Mark was on camera duty for the blog, taking photos of photographers. This shoot was for their new product launch – in March – so I can’t share any shots of the bottle as yet.

We had wondered about putting the house to work as a location for a while – I’d read good things about it, but also nightmare stories of people scraping inch thick layers of paint from particularly popular homes.

I’m pleased to say that the team (including Foxhole’s James and Donna and specialist drinks photographer Rob Lawson) were lovely and the  house survived the experience unscathed, but it was interesting how different this was to the KBB shoot. This time the product was the star rather than the house, and it was all about using aspects of our space to show it to best advantage. This led to some temporary reconfiguration – regular readers will recall that the sofa isn’t usually located immediately behind our desk!

img_3367

Some quite unexpected things were pressed into service, including this table which usually serves as our bedroom phone charging stand. It’s lovely but tiny  – the chap we bought it from 20 years ago thought it was probably an exam piece for someone’s joinery apprenticeship. By contrast my cocktail cabinet, which I thought would be the star of the show, didn’t get a look in.

It was great to dip our toe into the water of this world without having to register with an agency,  which begs the big question – would we do it again? And yes I think we probably would. It’s a relatively painless way to earn some extra money (not forgetting that it will need to go on the tax return), and a fun way to get an insight into a more creative world.

Plant Life (or death)

So this Wednesday we’ve got a before and after post, only the before is the good bit and the after is the bad…Or maybe the after is the middle and we’ve not got to the end yet, because as you know from previous What Went Wrong Wednesdays, there’s always hope.

Basically, I’ve been killing my houseplants. Not intentionally, but with an unhappy  combination of neglect and helicopter nurturing. Plants and I have a checkered history. At the old house I watered our one plant so well that I rotted the carpet – and killed the plant. And that was it for ten years or so.

img_3288

So when I reentered the fray with a Madagascar Dragon Tree for the loft bathroom I installed a precautionary ‘plant saucer’ underneath (actually a pizza tray from a hardware store in Ilford). And bless it, it’s doing very well – surviving a full five years and the move over the road. Once a week it gets the leftovers from our bedside glasses of water and by good chance that’s just about the right amount. But of course that convinced me that I had green fingers, and with plant filled houses filling Pinterest just as I was planning the new place that gave me ideas…

img_3268

Some have worked really well. This parade of cactuses sit on the shelf above our desk area, and immediately under the skylight. The shelf was a happy accident –  an impromptu solution when the skylights and the steel met somewhere unexpected. I guess it offers a pretty good simulation of desert conditions, and as a bonus these guys tell me when they need watering – they get a good soak whenever the prickly pear starts to lean over.


Others less so. I love this spidery thing in our bedroom and two months ago it was looking lush…today not so much. Likewise one of the pair in the hallway has tragically bitten the dust, and, this it the third (or is it fourth) incarnation of Gerry The Cactus in Ben’s bedroom. Pretty certain the problem here is helicoptering. Unlike the shelf cacti these guys are in pots with no drainage, and get overwhelmed if I’m even the slightest bit heavy handed with the watering. I hoped that a spray bottle would solve the problem, but I over-squirted. Clearly need to do some more homework on cactus care.

Whereas the houseplant gang on the kitchen shelf are under-watered I think. Or maybe some under and some over. In any event they’re all but dead. Still, the good thing is that I got to enjoy them for nearly a year. And Molly and Bill Stevens are just down the road – this emergency cactus top-up this afternoon cost me a fiver. And I’ve still not spent my housewarming present from mum so a half term visit to the Camden Garden Centre with their lush houseplant collection, is calling me. Only this time I will read the care labels, I promise.